You can do some beautiful things with white ink. Whether it’s on kraft or one of our other stocks the effects can be stunning. We already produce quite a few offline orders with white ink and in 2014 we will offer kraft with white ink online…..just don’t ask me for a date yet. Laura Mitzelfelt from www.lmitzdesign.com shared this PDF so you can see how she prepares files for white ink (Thanks Laura). PDF_with_White_Ink_Channel
1. First, you will need to set up your white ink swatch. At the menu at the top, go to Window > Swatches.
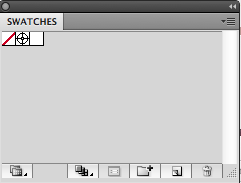
It should bring up this menu: Click on the button to the left of the trash can to create a new swatch. You will want to name the swatch White_Ink (case sensitive), set the color type to Spot Color, and plug in whatever CMYK values you want so you can distinguish your white ink printing from the rest of your design.
The options should look similar to this:

Now, you have set up a spot color for white ink!
2. You can apply this color swatch to any object by selecting the object, and then clicking on the White_Ink color box that was created in your swatch window.
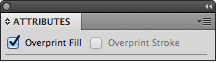
3. If you would like a white ink layer underneath a design (such as light pink text that won’t show well on Kraft stock), then we need to make sure the white ink layer does not knock out the design. To do this, you will need to duplicate the designs that need white ink underneath them and change the color to White_Ink. Make sure that the white ink layers are on top of the actual designs. Then, go to Window > Attributes to bring up another window. Select all of the white ink portions that need to be underneath a design, and then check the box that says “Overprint Fill”. This will ensure that the white ink layer is separate from what is underneath it, and will not knock the design out when the print ready PDF is created.
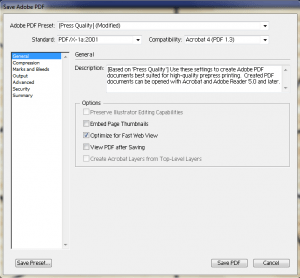
4. Once your design is completed, you can save your PDF by going to File > Save and selecting Adobe PDF as the file format. The best settings to use are below:
